I would like to share my favorite text editor.
PSPad, helped me many times with different encodings
http://www.pspad.com/en/download.php
Wednesday, May 27, 2009
Monday, May 11, 2009
Installation of a HP Fiber Optic SAN solution
Installation of MSA 1000 & MSA 1500cs.
Steps
1. Prepare servers
Install the Operating System and configure all devices.
2. Install HBAs in the Server
Physically install the HBA in the system. OS must find the device and prompt for driver installation. We must cancel out that window and install the appropriate driver from MSA drivers CD. Otherwise an unsupported driver will be installed by OS.
3. Prepare any Hubs or SAN Switches
Configure any devices that will provide access and connectivity to MSA array.
4. Install MSA on Rack (if not already installed)
Physically install the MSA device on rack and connect any cables and install hard disk drives in enclosures.
5. Power up the MSA
Power up the device and wait until to get the “MSA Startup Complete” message. Check for any error messages by pressing the cross on panel.
6. Determine if any firmware update is required
Download and update MSA controller firmware if necessary from HP MSA support web site.
7. Configure MSA Array
Configure MSA Array either by using command line interface (CLI) or Array Configuration Utility (ACU).
8. Initialize created LUNs and define partitions
By using system disk management initialize and define partitions for the file system. In case we have two servers that require accessing a shared file system, those servers must form a cluster. After that the new disk will be visible to the operating system.
Outlook 2003 mailbox size
Our users are configured to connect to the exchange server (Exchange 2003 Enterprise) using cached mode. Therefore all the mailbox data (messages) stay on the server.
Problem Description
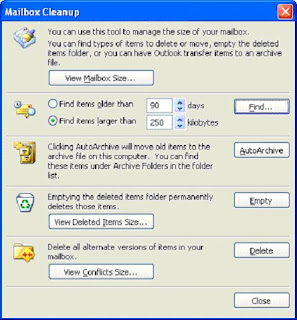
A user's mailbox size on server (Exchange Ent) is close to 24GB, therefore the local outlook .ost file (in user's computer) reached the maximum large file size that by default outlook supports and the user was getting the Mailbox Cleanup window each time he was trying to use Outlook 2003.
"You have exceeded the size limit on your mailbox"

No operations send/receive were available.
The Options were
Resolution
The solution came by following the article from Microsoft Support bellow. I increased the Maximum Large File Size for Outlook by defining a new Policy as described in the bellow.
http://support.microsoft.com/kb/832925/en-us?spid=2520&sid=1379
Note:
The path HKEY_CURRENT_USER\Software\Microsoft\ was there but nothing else related with Office so I had to create the following registry keys
HKEY_CURRENT_USER\Software\Policies\Microsoft\Office\11.0\Outlook\PST
After that I followed the provided instructions, specified the following values
and everything worked fine.
Dimitris
Problem Description
A user's mailbox size on server (Exchange Ent) is close to 24GB, therefore the local outlook .ost file (in user's computer) reached the maximum large file size that by default outlook supports and the user was getting the Mailbox Cleanup window each time he was trying to use Outlook 2003.
"You have exceeded the size limit on your mailbox"

No operations send/receive were available.
The Options were
- To empty deleted messages.
- Delete conflicts size.
- Enable auto archive.
Resolution
The solution came by following the article from Microsoft Support bellow. I increased the Maximum Large File Size for Outlook by defining a new Policy as described in the bellow.
http://support.microsoft.com/kb/832925/en-us?spid=2520&sid=1379
Note:
The path HKEY_CURRENT_USER\Software\Microsoft\ was there but nothing else related with Office so I had to create the following registry keys
- Office
- 11.0
- Outlook
- PST
HKEY_CURRENT_USER\Software\Policies\Microsoft\Office\11.0\Outlook\PST
After that I followed the provided instructions, specified the following values
- MaxLargeFileSize: 30720 (Decimal)
- WarnLargeFileSize: 29696 (Decimal)
and everything worked fine.
Dimitris
Sunday, May 10, 2009
MOSS 2007 & SSP login denied Error 401.1
The following weird situation created in our SharePoint Server.
With no specific reason I wasn't able to access the Shared Services Provider (SSP) Administration website from Sharepoint Central Administration.
I was able to login to the Central Administration Panel normally using my service account (domain admin account). But when I was trying to access the SSP after 3 attempts I was getting
You are not authorized to view this page
HTTP Error 401.1 - Unauthorized: Access is denied due to invalid credentials. Internet Information Services (IIS)
Initially I was investigating the case that maybe I have the the same name for the IIS Application Pool assigned to the SSP Admin application and the Shared Services Provider. But it was clear that I have different IIS Application pool for Shared Services Provider and another for SSP Admin application.
So I had:
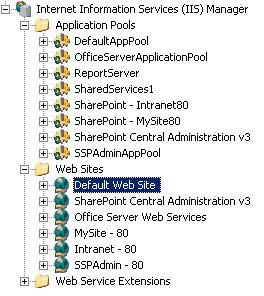
SharedShervices1 / ISS App Pool: SharedShervices1
SSP Admin - 80 / SSPAdminAppPool

The above case is discused in the link below:
http://faraz-khan.blogspot.com/search/label/MOSS%202007%20SSP%20access%20denied
Finnaly I found the cause of my problem. It was loopback check security feature of windows 2003 Server.
"Loopback check security feature is designed to help prevent reflection attacks on your computer. Therefore, authentication fails if the FQDN or the custom host header that you use does not match the local computer name. "
http://support.microsoft.com/kb/896861
I disabled through registry the loopback check
With no specific reason I wasn't able to access the Shared Services Provider (SSP) Administration website from Sharepoint Central Administration.
I was able to login to the Central Administration Panel normally using my service account (domain admin account). But when I was trying to access the SSP after 3 attempts I was getting
You are not authorized to view this page
HTTP Error 401.1 - Unauthorized: Access is denied due to invalid credentials. Internet Information Services (IIS)
Initially I was investigating the case that maybe I have the the same name for the IIS Application Pool assigned to the SSP Admin application and the Shared Services Provider. But it was clear that I have different IIS Application pool for Shared Services Provider and another for SSP Admin application.
So I had:
SharedShervices1 / ISS App Pool: SharedShervices1
SSP Admin - 80 / SSPAdminAppPool

The above case is discused in the link below:
http://faraz-khan.blogspot.com/search/label/MOSS%202007%20SSP%20access%20denied
Finnaly I found the cause of my problem. It was loopback check security feature of windows 2003 Server.
"Loopback check security feature is designed to help prevent reflection attacks on your computer. Therefore, authentication fails if the FQDN or the custom host header that you use does not match the local computer name. "
http://support.microsoft.com/kb/896861
I disabled through registry the loopback check
Disable the loopback check
Follow these steps:- Click Start, click Run, type regedit, and then click OK.
- In Registry Editor, locate and then click the following registry key: HKEY_LOCAL_MACHINE\SYSTEM\CurrentControlSet\Control\Lsa
- Right-click Lsa, point to New, and then click DWORD Value.
- Type DisableLoopbackCheck, and then press ENTER.
- Right-click DisableLoopbackCheck, and then click Modify.
- In the Value data box, type 1, and then click OK.
- Quit Registry Editor, and then restart your computer.
Subscribe to:
Comments (Atom)